How to hide files on windows 10||file hiding feature
No matter what kind of content you keep on your computer, you’ll always find reasons to hide certain files and folders. Perhaps you have important documents and videos that you want to keep under wraps, or you simply want to prevent users from accidentally deleting certain files if you’re sharing your PC with other people.
For whatever the reason it might be, on Windows 10, you can quickly hide a file or folder in two different ways, including using File Explorer or using the attrib command using Command Prompt.
In this Windows 10 guide, we’ll walk you through the easy steps to hide a file and folder on your computer. In addition, you’ll learn the steps to access those hidden items as needed.
How to hide files and folders using File Explorer
The easiest way to keep content hidden is using File Explorer.
- Open File Explorer.
- Navigate to the file or folder you want to hide.
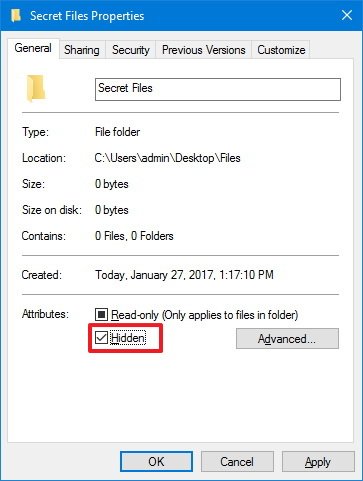
- Right-click the item and click on Properties.
- On the General tab, under Attributes, check the Hidden option.
- Click Apply.
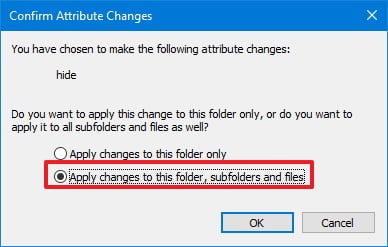
- If you’re hiding a folder with files and subfolders, make sure to select the Apply changes to this folder, subfolders, and files option.
- Click OK.
- Click OK again to complete the task.
Once you’ve completed the steps, the hidden items will not be visible anymore, because by default Windows 10 doesn’t show hidden files.
When you have any file or folder you want to keep away from prying eyes, use this guide to hide them using File Explorer or Command Prompt.MAURO HUCULAK28 Jan 2017 17
No matter what kind of content you keep on your computer, you’ll always find reasons to hide certain files and folders. Perhaps you have important documents and videos that you want to keep under wraps, or you simply want to prevent users from accidentally deleting certain files if you’re sharing your PC with other people.
For whatever the reason it might be, on Windows 10, you can quickly hide a file or folder in two different ways, including using File Explorer or using the attrib command using Command Prompt.
In this Windows 10 guide, we’ll walk you through the easy steps to hide a file and folder on your computer. In addition, you’ll learn the steps to access those hidden items as needed.
How to hide files and folders using File Explorer
The easiest way to keep content hidden is using File Explorer.
- Open File Explorer.
- Navigate to the file or folder you want to hide.
- Right-click the item and click on Properties.
- On the General tab, under Attributes, check the Hidden option.
- Click Apply.
- If you’re hiding a folder with files and subfolders, make sure to select the Apply changes to this folder, subfolders, and files option.
- Click OK.
- Click OK again to complete the task.
Once you’ve completed the steps, the hidden items will not be visible anymore, because by default Windows 10 doesn’t show hidden files.
Best online learning tools for kids: ABCmouse, Reading IQ, & more
If you want to access your hidden items you’ll have to type the complete path to the hidden folder or file you want to open and press Enter. For example: C:\Users\admin\Desktop\Files\Secret Files\Great Secret.txt.
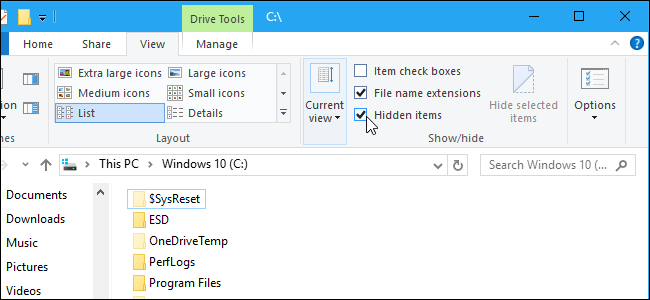
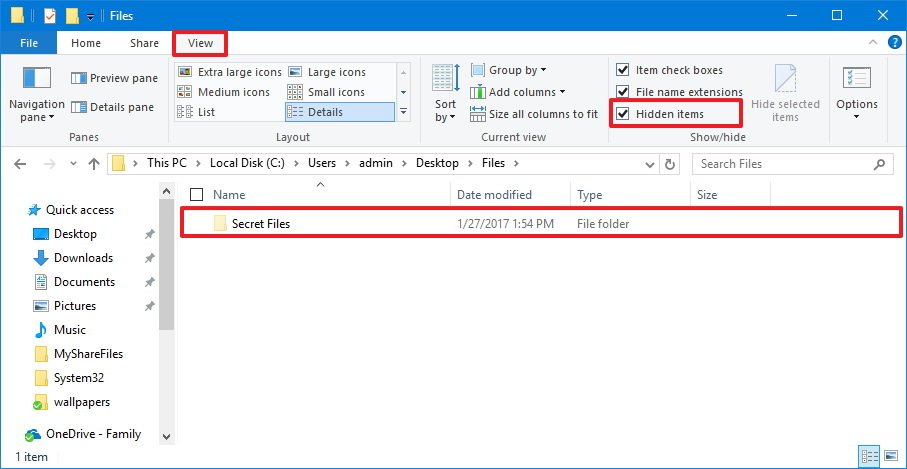
Or you can open File Explorer, click on the View tab and make sure to check the Hidden items option. Then you can browse your hidden items as you would normally do with other content.
At any time, you can make the files and folders visible again by using the same steps mentioned above, but this time on step 4 make sure to clear the Hidden option.
How to hide files and folders using Command Prompt
Alternatively, you can also use Command Prompt to hide files and folders on your computer.
- Open Start.
- Do a search for Command Prompt and click the result.
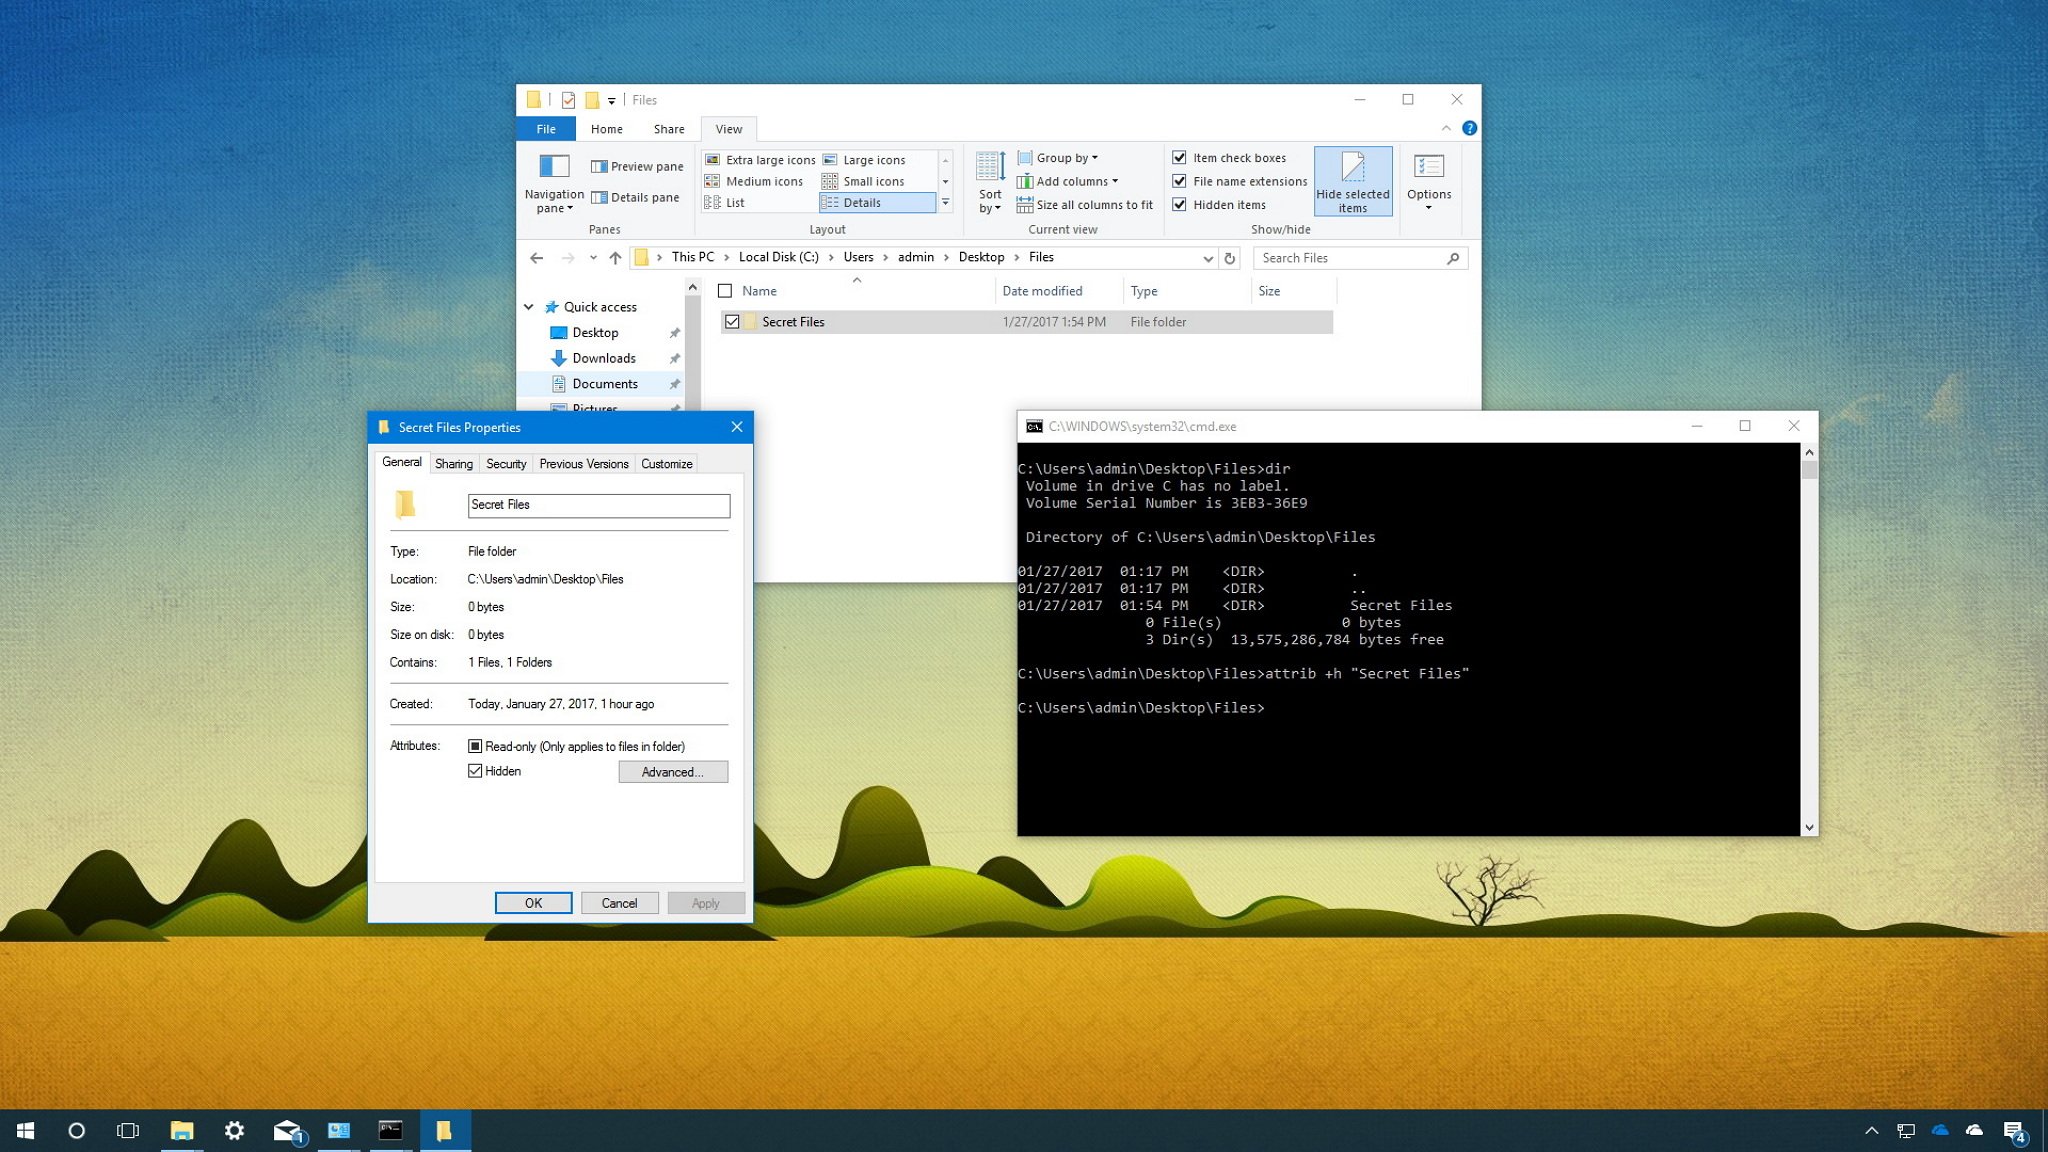
- Type the following command to navigate to the items you want to hide and press Enter:
cd C:\Users\admin\Desktop\FilesIn the command replace the path after cd with the path to your file or folder. - Type the following command to hide a folder or file and press Enter:
attrib +h "Secret Files"In the command replace “Secret Files” with the name of your folder or file. Quotation marks are only necessary when there are spaces in the name.
If you’re trying to hide a folder with files and subfolders, which you also want to keep hidden, then you’ll need to use these steps as well.
- While in Command Prompt type the following command to navigate inside the hidden folder and press Enter:
cd "Secret Files"In the command replace “Secret Files” with the name of your hidden folder. - Type the following command to hide all files and folders inside the hidden folder and press Enter:
attrib +h /s /d
After completing the steps, the items with the hidden attribute will no longer be visible.
Making hidden files and folders visible again
If you change your mind, you can use the following steps to remove the hidden attribute for files and folders.
- Open Start.
- Do a search for Command Prompt and click the result.
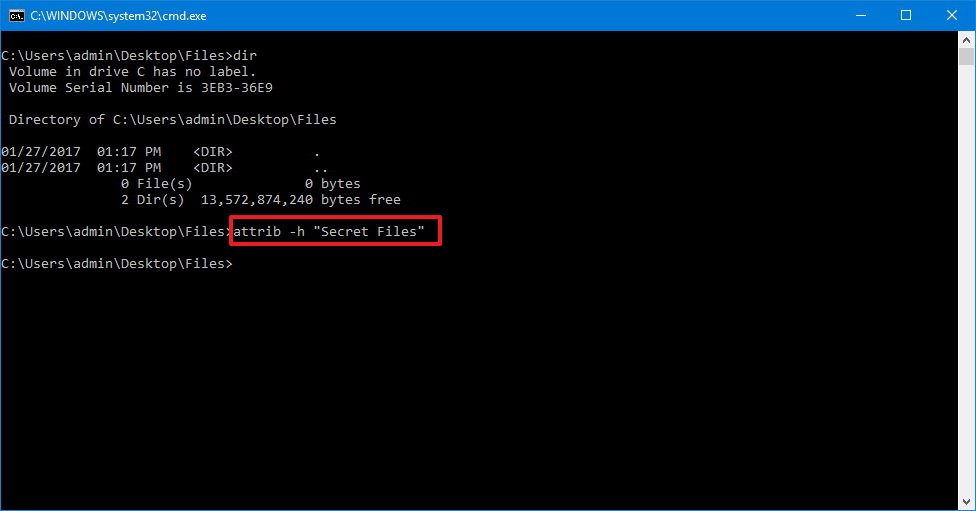
- Type the following command to navigate to the hidden items location and press Enter:
cd C:\Users\admin\Desktop\FilesIn the command replace the path after cd with the path to your file or folder. - Type the following command to make the items visible again and press Enter:
attrib -h "Secret Files"In the command replace “Secret Files” with the name of your folder or file. Quotation marks are only necessary when there are spaces in the name.
In the case you also set the hidden attribute for files and subfolders inside of a folder, then do the following to remove the attribute.
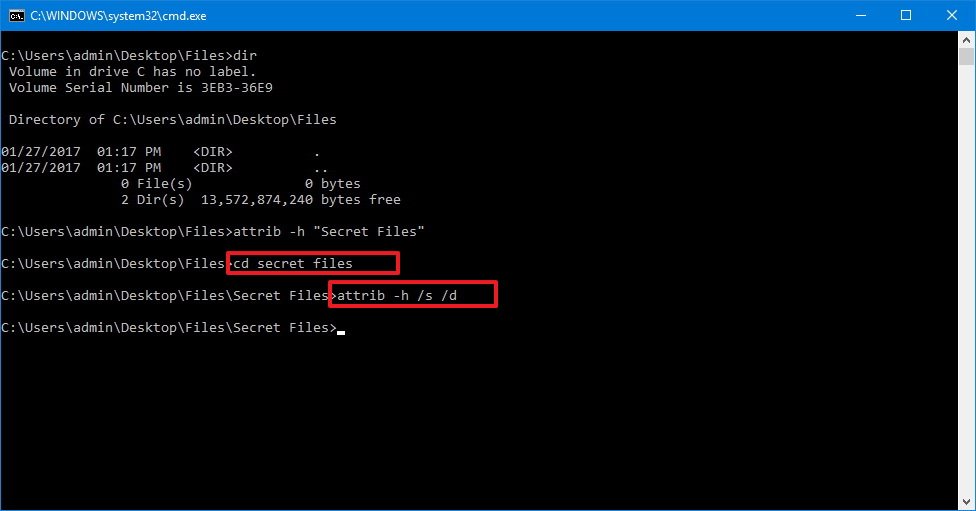
- While in Command Prompt type the following command to navigate inside the hidden folder and press Enter:
cd "Secret Files"In the command replace “Secret Files” with the name of your hidden folder. - Type the following command to remove the hidden attribute from all files and folders inside the folder and press Enter:
attrib -h /s /d
How to hide files and folders using Command Prompt
Alternatively, you can also use Command Prompt to hide files and folders on your computer.
- Open Start.
- Do a search for Command Prompt and click the result.
- Type the following command to navigate to the items you want to hide and press Enter:
cd C:\Users\admin\Desktop\FilesIn the command replace the path after cd with the path to your file or folder. - Type the following command to hide a folder or file and press Enter:
attrib +h "Secret Files"In the command replace “Secret Files” with the name of your folder or file. Quotation marks are only necessary when there are spaces in the name.
If you’re trying to hide a folder with files and subfolders, which you also want to keep hidden, then you’ll need to use these steps as well.
- While in Command Prompt type the following command to navigate inside the hidden folder and press Enter:
cd "Secret Files"In the command replace “Secret Files” with the name of your hidden folder. - Type the following command to hide all files and folders inside the hidden folder and press Enter:
attrib +h /s /d
After completing the steps, the items with the hidden attribute will no longer be visible.
Making hidden files and folders visible again
If you change your mind, you can use the following steps to remove the hidden attribute for files and folders.
- Open Start.
- Do a search for Command Prompt and click the result.
- Type the following command to navigate to the hidden items location and press Enter:
cd C:\Users\admin\Desktop\FilesIn the command replace the path after cd with the path to your file or folder. - Type the following command to make the items visible again and press Enter:
attrib -h "Secret Files"In the command replace “Secret Files” with the name of your folder or file. Quotation marks are only necessary when there are spaces in the name.
In the case you also set the hidden attribute for files and subfolders inside of a folder, then do the following to remove the attribute.
- While in Command Prompt type the following command to navigate inside the hidden folder and press Enter:
cd "Secret Files"In the command replace “Secret Files” with the name of your hidden folder. - Type the following command to remove the hidden attribute from all files and folders inside the folder and press Enter:
attrib -h /s /d
Which method do you prefer to hide files and folders on Windows 10? Tell us in the comments below.
Hide a File or Folder on Windows
To hide a file or folder on Windows, open a Windows Explorer or File Explorer window and locate the file or folder you want to hide. Right-click it and select Properties.
![open-properties-window-to-hide-file-on-windows-8.1[4]](https://www.howtogeek.com/wp-content/uploads/2014/08/xopen-properties-window-to-hide-file-on-windows-8.14.png.pagespeed.gp+jp+jw+pj+ws+js+rj+rp+rw+ri+cp+md.ic.bZ93uUntde.png "open-properties-window-to-hide-file-on-windows-8.1[4]")
Enable the Hidden checkbox on the General pane of the Properties window. Click OK or Apply and your file or folder will be hidden.

RELATED: Make a Super Hidden Folder in Windows Without any Extra Software
Windows also has a second type of hidden file or folder, known as a “system file.” There’s a separate option to enable viewing system files and folders. You can make an extra-hidden file by marking it as a system file — people will have to go out of their way to disable the “Hide protected operating system files (recommended)” option to find it. You can’t do this from the graphical interface, so follow our guide to marking files and folders as system files on Windows if you want to do this.
View Hidden Files and Folders on Windows
RELATED: How to Show Hidden Files and Folders in Windows 7, 8, or 10
To view a hidden file or folder on Windows 8 or 10, click the View tab on the ribbon at the top of the File Explorer window and enable the Hidden items checkbox under Show/hide. Hidden files and folders will have partially transparent icons, so you can easily tell which are hidden and which are normally visible.

On Windows 7, click the Organize button on the toolbar and select Folder and search options.

Click over to the View tab and select the Show hidden files, folders, and drives option. Click OK or Apply to save your changes.

Hide a File or Folder on Linux
Linux hides files and folders that have a period at the start of their name. To hide a file or folder, just rename it and place a period at the start of its name. For example, let’s say you had a folder named Secrets you wanted to hide. You’d rename it to .Secrets, with the period in front. File managers and other utilities will hide it from view by default.

View Hidden Files and Folders on Linux
RELATED: 7 Ubuntu File Manager Features You May Not Have Noticed
Click the “Show hidden” option in your file manager of choice to view hidden files and folders on Linux. For example, in the Nautilus file manager used on Ubuntu and other GNOME-based Linux distributions, click the View menu and select Show Hidden Files.

The option will just display files an folders with a period at the start of their name.

You can view hidden files in an Open or Save dialog, too. On Ubuntu and other GNOME-based Linux distributions, just right-click in the list of files and select the Show Hidden Files option.
Hide a File or Folder on Mac OS X
RELATED: A Windows User’s Guide to Mac OS X Keyboard Shortcuts
Macs also hide files and folders beginning with a . character. There’s also a special “hidden” attribute the Finder will obey. Hiding a file or folder is a bit more difficult on a Mac. Try to rename a file or folder so it begins with a period and the Finder will tell you “these named are reserved for the system.” There’s also no way to quickly toggle the hidden attribute in the Finder’s graphical interface.
You can quickly mark a file or folder as hidden with the chflags command in the terminal. First, open a Terminal window by pressing Command + Space, typing Terminal into the Spotlight search dialog, and pressing Enter.
Type the following command into the terminal, but don’t press Enter:
chflags hidden
Be sure to type a space after “hidden.”
Next, locate the file or folder you want to hide in the Finder. Drag and drop it to the terminal. The file or folder’s exact path will appear in the terminal.
Press Enter to run the command. This will mark the file as hidden.
Use the same command to unhide a file or folder in the future, using “chflags nohidden” instead of “chflags hidden”.
View Hidden Files and Folders on Mac OS X
Mac OS X has a secret keyboard shortcut to view hidden folders and files in any program’s Open or Save dialog. Just press Command + Shift + Period. Note that this only works in Open and Save dialogs — not in the Finder itself. However, this may be the most convenient way to quickly access your hidden files when you need them.
The Finder doesn’t have a graphical option for viewing hidden files and folders. Instead, you’ll have to use a command. First, open a Terminal window in the same way as above. Run the following commands on Mac OS X 10.9 Mavericks. These commands will set the Finder to always show hidden files and restart the finder so your changes will take effect. Type each command into the terminal and press Enter after each.
Thank you for visiting our page hope you have gained something from our page


